Required
Ingestion
Topics, QoS, payload format, timestamps, and how we detect a device that goes offline. Your devices connect outward to our broker, with credentials you can revoke at any time.
bloomiot/v1/d/<deviceId>/telemetry
Documentation
If your devices already publish over MQTT — or your gateway runs its own LoRaWAN network server — you do not need to wait for anyone. We issue credentials, you map your fields, and you get zone mapping, history, and alerts running on the hardware already in the field.
MQTT 3.1.1 / 5.0 · LoRaWAN · TLS 1.2+ · JSON · no SDK required
What each device type actually publishes
The same telemetry contract, three real shapes. Pick a device type to see its payload and which fields the Workspace already understands.
{
  "deviceId": "node-lot3-04",
  "ts": "2026-08-27T14:20:05Z",
  "zone": "zone-b",
  "fw": "1.4.2",
  "metrics": {
    "soil_moist": 0.31,
    "battery_v": 3.71
  },
  "status": {
    "rssi": -78
  }
}metrics.soil_moist → Soil moisturemetrics.battery_v → Batterystatus.rssi → Signal strengthA Soil Sensor Node reports moisture and battery on a fixed interval — no valve, no pressure, just the field reading.
Ingestion and mapping are enough for full monitoring. Remote control is optional and depends on your firmware.
Topics, QoS, payload format, timestamps, and how we detect a device that goes offline. Your devices connect outward to our broker, with credentials you can revoke at any time.
bloomiot/v1/d/<deviceId>/telemetryMatch the fields in your JSON to Workspace variables, with unit conversion and a preview of the last message received.
soil_moist (0–1) → Soil moisture (%)To open and close valves from the Workspace, your firmware needs to subscribe to the commands topic and report status back. Without it, everything else still works in monitoring mode.
.../commands · QoS 1Ingestion is uniform: anything that publishes gets in. Control is not, and we would rather say so here than have you discover it mid-integration.
Native MQTT
Your firmware, ESP32 or other MCU
MQTT client over TLS and a subscription to the commands topic.
LoRaWAN
Your gateway's built-in server
An MQTT integration in the gateway's own network server, pointed at the credentials the Workspace issues.
LoRaWAN (Bloomiot Network Server)
Hosted by us · Scale and up
Point the gateway at our LNS. We register every node and issue its OTAA keys.
REST API / webhook
Platforms and dataloggers
A token-authenticated endpoint. No return channel to the device.
The same path every bring-your-own-hardware account follows inside the Workspace.
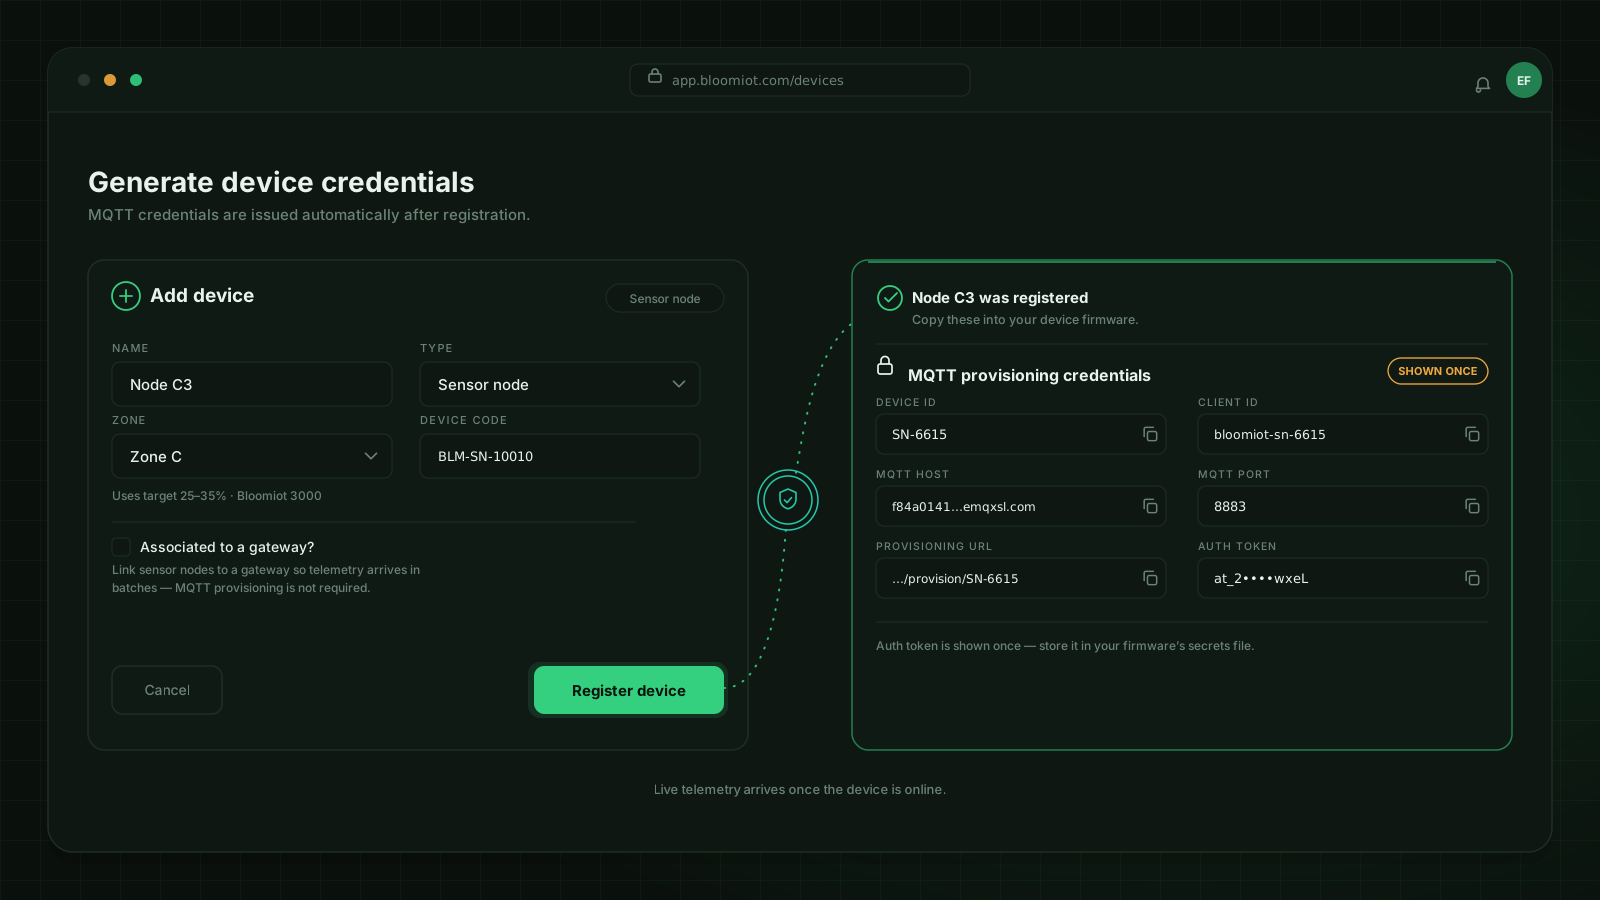
Generate device credentials
Register the device and publish a test message
Map your JSON fields to Workspace variables
Send real telemetry and confirm it lands on the device
Assign the device to a zone
Turn on the alerts that apply to your data
The same schema every device — Bloomiot or third-party — publishes against.
Protocol
MQTT 3.1.1 / 5.0
Transport
TLS 1.2+ · port 8883
QoS
1 · at least once
Telemetry interval
From 60 s per device
Identity
1 credential per device
Commands
QoS 1 · JSON envelope
Timestamp
ISO 8601 UTC
Offline detection
Status topic · Last Will pattern
Firmware transfer
Never over MQTT · HTTPS + SHA-256
bloomiot/v1/d/{deviceId}/telemetryDevice → cloud. Sensor readings, or a gateway batch of child nodes.
bloomiot/v1/d/{deviceId}/statusDevice → cloud. Connection state; doubles as Last Will when the device drops without warning.
bloomiot/v1/d/{deviceId}/commandsCloud → device. Valve control, reboot, and OTA update, QoS 1.
bloomiot/v1/d/{deviceId}/events/otaDevice → cloud. OTA progress: accepted, downloading, verifying, success, failed.
Every field beyond deviceId and ts is optional — send only what your hardware measures.
deviceIdstringRequiredtsISO 8601Requiredmetrics.soil_moist0 – 1Optionalmetrics.pressure_bar0 – 20 barOptionalmetrics.flow_lpm0 – 1000 L/minOptionalmetrics.battery_v0 – 5 VOptionalstatus.valveopen · closedOptionalstatus.rssinumberOptionalExample: a device publishing telemetry
LoRaWAN
Same Workspace, same alerts, same history. What changes is who runs the network server: your gateway, or us.
Most third-party gateways ship a network server on board, usually ChirpStack. Your nodes join it, their session keys never leave your site, and the gateway forwards each uplink to Bloomiot over MQTT.
For gateways with no server of their own, or fleets that would rather not run one. You point the gateway at our LNS and we handle the join, the keys and the routing.
You do not have to guess which one you are on
The Workspace decides from the gateway model. Hardware we know ships an embedded server is set to it; hardware we know has none goes to ours. Only a model we have no record of leaves the choice open, and then the Network server field on the registration form is yours to set.
Both end in the same place: a device reporting into a zone. What differs is the middle.
Register the gateway
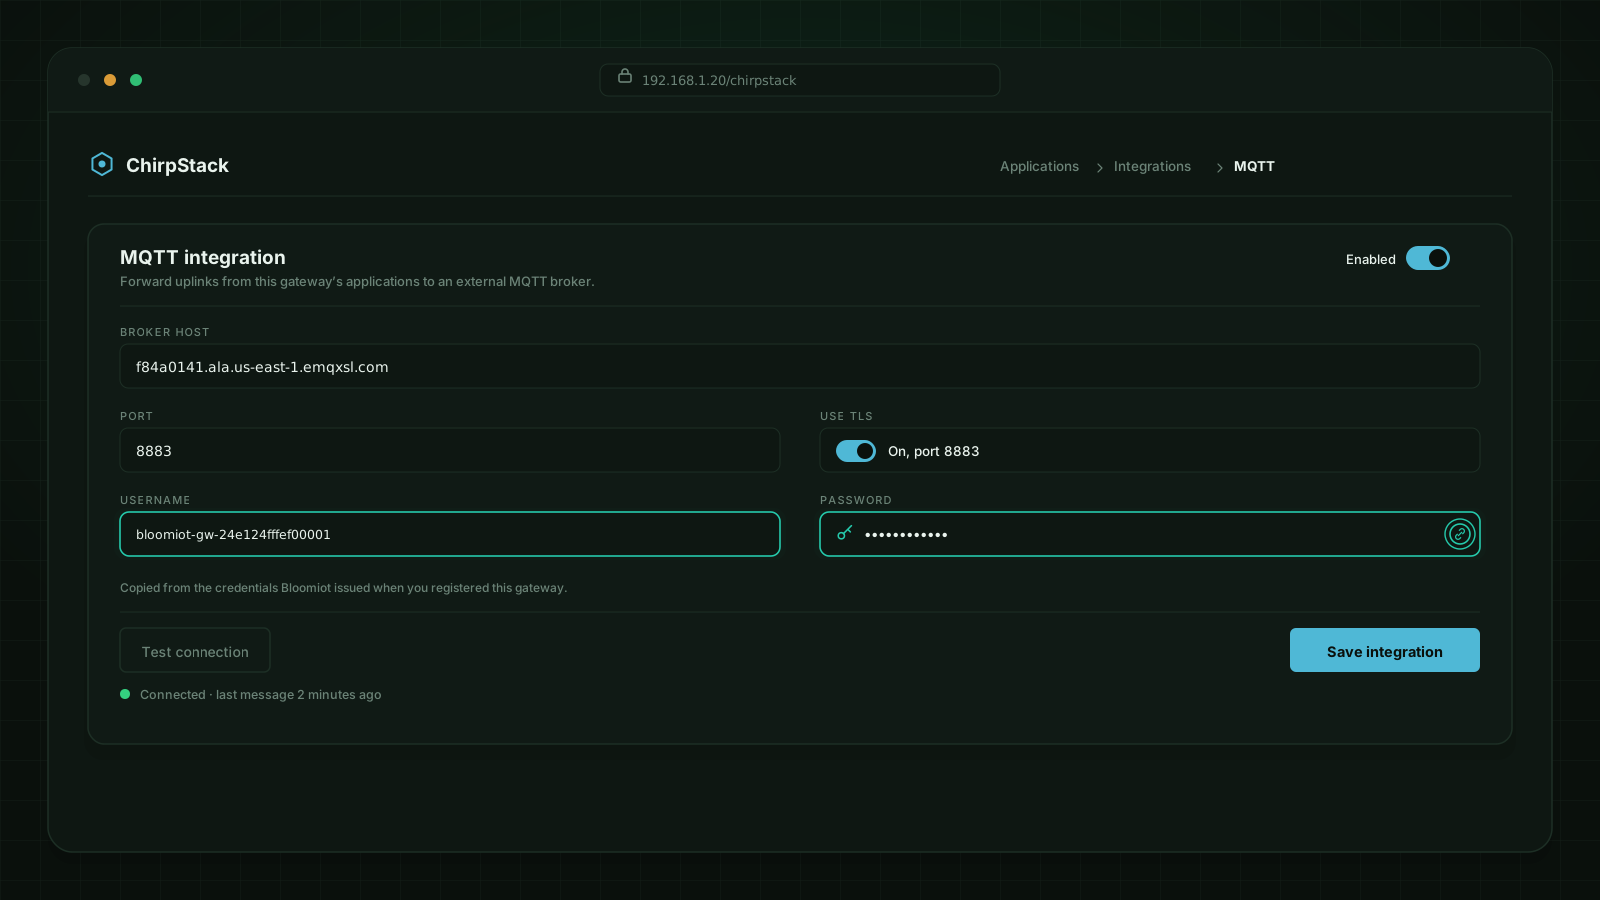
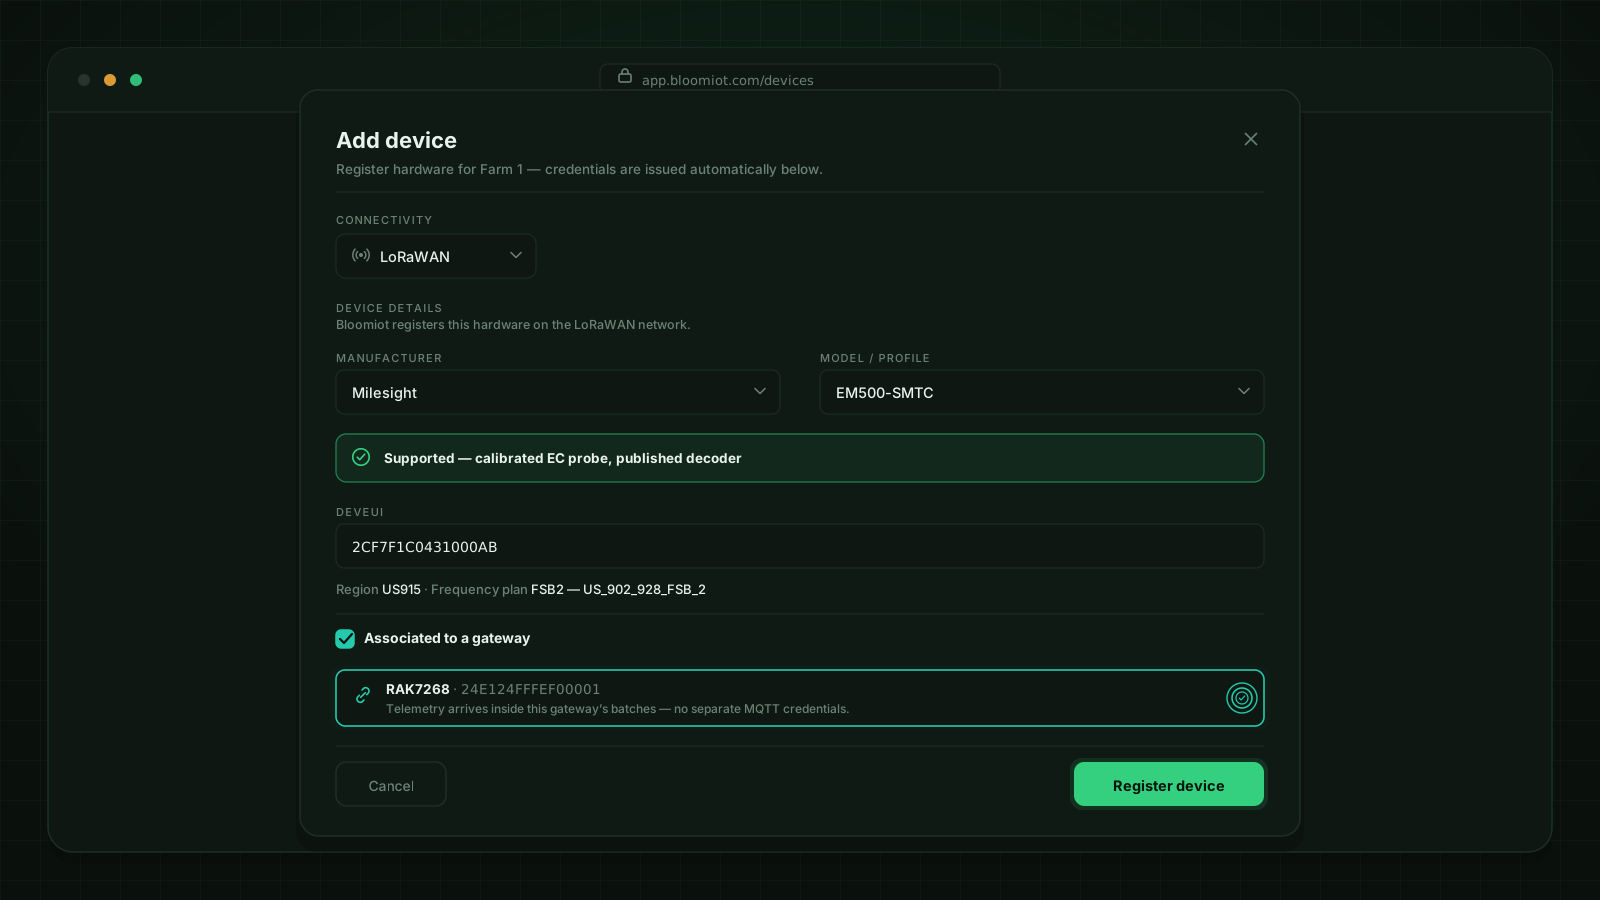
Devices → Add device, connectivity LoRaWAN, type Gateway. Pick manufacturer and model; the Network server field resolves to Built into this gateway.
Copy the MQTT credentials
Registration issues a broker host, a username and a password, shown once. Download the setup file before closing the dialog.
Point the gateway's server at Bloomiot
In its admin UI: ChirpStack → Applications → Integrations → MQTT. Enter the host over TLS and the credentials from step 2.
Declare your nodes in ChirpStack
Each node needs a device profile with a payload codec. Bloomiot reads the decoded object, so a node without a codec arrives carrying bytes nobody can read.
Register the same nodes in the Workspace
Add each one by DevEUI and associate it to the gateway from step 1. The DevEUI is what pairs an uplink to a device.
Confirm the first uplink
The node turns online and its readings land in the device history. Then map the fields you want charted and assign the device to a zone.
Register the gateway
The same form, with Network server set to Bloomiot Network Server.
Point the gateway at our LNS
The setup sheet carries the LNS and CUPS endpoints, the gateway key and the frequency plan for your region.
Register each node by DevEUI
Bloomiot provisions it on the network server and issues its JoinEUI and AppKey.
Load the OTAA keys into the node
DevEUI, JoinEUI and AppKey, with the vendor's configuration tool. Then power it up to join.
Confirm the join
The node reports as joined once the network server has seen it, and readings follow on its own reporting interval.
Map and assign
The same last step as every other route: map the fields you want and put the device in a zone.
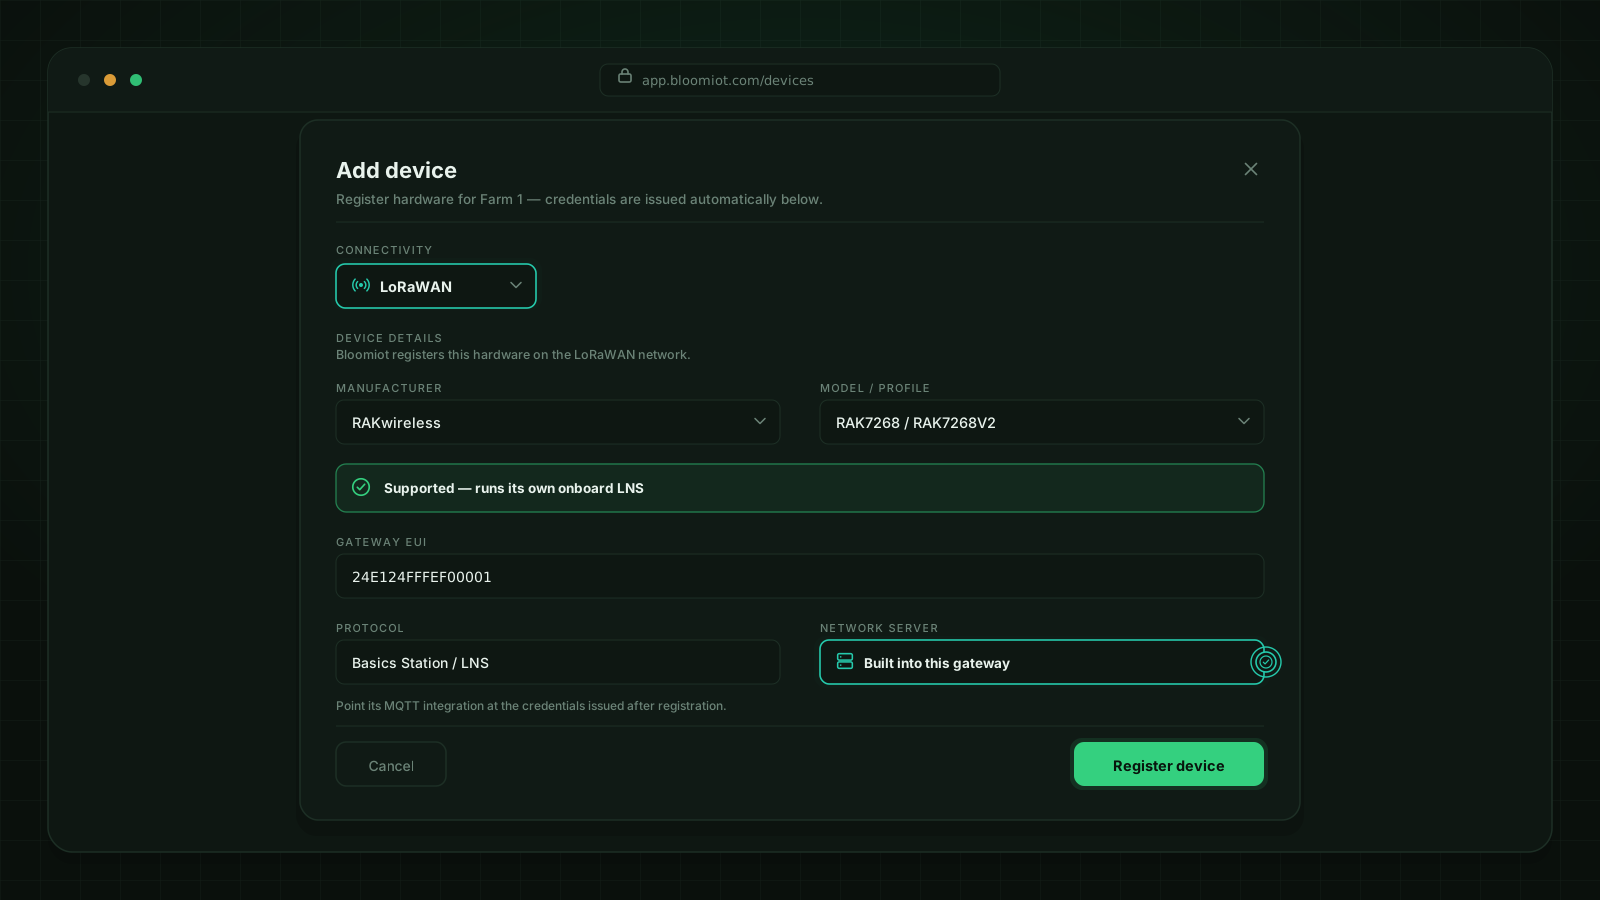
Workspace · registering the gateway, with the network server its model resolves to
Both network servers wrap the same thing: whatever your device profile's codec decoded. That object is what we map.
application/{applicationId}/device/{devEui}/event/upGateway → Bloomiot. One publish per node uplink.
application/{applicationId}/device/{devEui}/command/downBloomiot → gateway. Queues a downlink on your own network server.
deviceInfo.devEui16 hexPairs the uplink to a registered devicedeviceInfo.applicationIdstringRecorded on first uplink · addresses downlinksobjectdecoded JSONCodec output — the readingstimeISO 8601Falls back to arrival timerxInfo[].rssinumberStrongest receiving gatewayChirpStack v3 and v4 both work — the DevEUI is read in either spelling. An uplink from a node you have not registered is dropped rather than stored: a shared band means your gateway also hears hardware that is not yours.
Your codec names its own fields. These are the names Bloomiot recognises; anything else is left out of the metrics rather than guessed at.
Soil moisture
soil_moist · soil_moisture · soilMoistureStored as 0–1. Above 1 is read as a percentage and scaled.
Line pressure
pressure_bar · pressureBar · pressurebar
Flow
flow_lpm · flowLpm · flowlitres per minute
Battery
battery_v · batteryV · battery_voltage · batteryVoltagevolts
humidity is deliberately absent. On most nodes it is air humidity, and feeding that to soil moisture would drive irrigation off the wrong number. If yours really measures soil, rename it in the codec.
ChirpStack's MQTT integration is bidirectional, so control needs no inbound connection to your gateway and no second API. Bloomiot publishes on the command topic and your own network server queues the downlink.
What Bloomiot publishes
{
  "devEui": "A84041XXXXXXXXXX",
  "confirmed": true,
  "fPort": 10,
  "object": { "valve": "open", "output": 1 }
}Class C
Receiver always open. The command applies within seconds.
Class B
Fixed beacon windows. The command applies at the next one.
Class A
Listens only right after it transmits. The command is queued and applies at the next uplink, typically 15 to 60 minutes.
The Workspace tells you which one applies before you confirm, from the model you registered. A controller that looks unresponsive is usually a Class A node that has not spoken yet.
Picking a model fills in the protocol, the frequency plan, the device class and whether the gateway runs its own network server. Anything not listed still registers — choose Other and set the fields yourself.
Most models are listed as supported: specifications known, fields pre-filled, standards-compliant. Verified is reserved for hardware we have actually powered up and run end to end.
Every alert declares which variable it needs. If your devices do not publish it, it shows disabled in the Workspace instead of failing silently.
Valve open without pressure
Line pressure falls below 1.8 bar while a valve is open.
pressure_bar + valve status
Sudden pressure drop
Pressure falls more than 0.8 bar faster than the expected pattern.
pressure_bar
Flow with valve closed
Flow above 1 L/min is detected while every valve should be shut.
flow_lpm + valve status
Moisture did not rise after irrigation
A zone rises less than 2% after a completed irrigation cycle.
soil_moist + zone
Device without communication
No message for more than 10 minutes, or the status topic reports offline.
nothing · any device
Battery nearing empty
Battery voltage falls under 20% for that node.
battery_v
Full catalog (18 rules) available inside the Workspace under Alerts.
The same modules, whether your data comes from Bloomiot hardware or your own devices.
Satellite intelligence
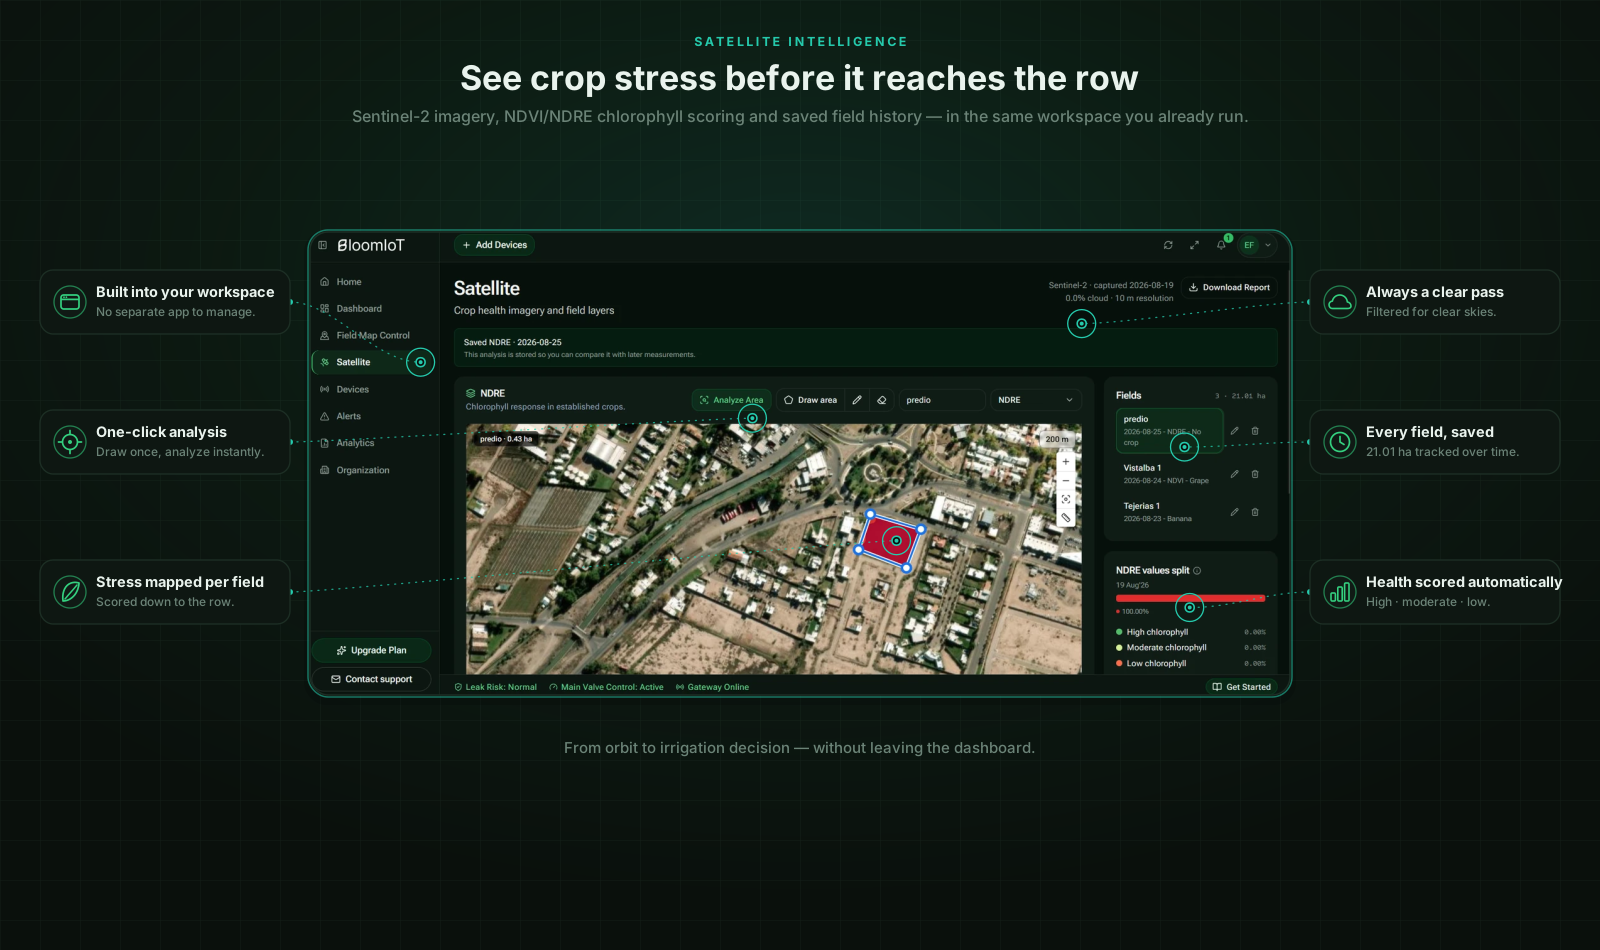
Scale and Enterprise plans layer Sentinel-2 satellite imagery on top of your ground data — no extra hardware, no extra integration, and it works no matter which route above you chose.
Whole-field coverage
A ground sensor reports one point. Sentinel-2 imagery covers the entire field at 10 m resolution, so a stressed zone without a nearby sensor still shows up.
Five vegetation and moisture indices
NDVI, NDMI, NDRE, MSAVI and RECI turn raw imagery into vigor, water-stress and chlorophyll signals your team can act on.
Works before the first device ships
Satellite layers populate as soon as a site is created — even before a single sensor is registered.
Cross-checks ground truth
When a sensor reading and the imagery disagree, that gap is often the first sign of a failing probe or an uneven irrigation pattern.
In development
Soil moisture nodes, an edge controller with valve actuation, and pressure-based leak detection. It ships provisioned from the factory: no integration, no mapping, no firmware to write. Not available yet — the installation guide publishes at launch.
Support
Send us a sample payload and the device model, request test credentials, or flag anything wrong with this page. Every message here reaches our team directly.